 |
| Base of box |
 |
| Side view |
 |
| Top view |
Here are the templates for the card/plastic and wadding pieces. Your hexagon can be any size (mine had 3" sides) The side piece must have the same length straight edges as the hexagon edges.
 |
| Copy and paste to print out |
1 base, in heavy card for the bottom of the box. And cut 1 piece (1/2" bigger all round) of lining
fabric
1 base in cereal box card* And cut 1 piece (1/2"" bigger all round) in main
fabric
1 base in low-loft batting
6 sides in cereal card/plastic And cut 6 pieces (1/2"" bigger all round) in
main fabric
6 sides in cereal card* And cut 6 pieces (1/2"" bigger all round) in
lining fabric
6 sides in low-loft wadding
* Don't cut any more than 1/8th smaller. Cutting the same size is OK but just a little shaved off each side makes the assembly of pieces much easier.
Sorry about the confusing formatting. It was created in old Blogger and new Blogger won't allow any changes. Aren't computers intuitive and helpful!
This looks so much more complicated than it actually is to do! Yet again, too many words and too little action. Naturally enough, I've
Cover all the pieces of card/plastic with fabric (and wadding where appropriate), by laying the fabric right sides down, place wadding on centrally, lay the card on top. Fold over edges and secure by glue stick or by threading from opposing sides. Be careful to pull the fabric tight enough to make the corners neat and sharp, but not so tight that the box will try to turn itself inside out!
The inside base and outside sides will all need wadding when covering the card/plastic.
The outside base and inside sides have no wadding. Glue these wrong sides together.
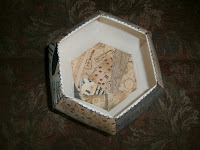
I used the left over pieces of my main fabric and scrap pieced them like this for the inside base.
Secure the inside and outside sides together in their pairs (is this even English?), by glue stick. I took each pair of sides (1 inside + 1 outside) and took large whip stitches (2 or 3 a side) all round the pair (these will be hidden when the sides are joined together). I'm not allowed to play with glue - not after the last incident (you really don't want to know). Suffice to say Superglue, fingers, blah blah blah.
Join all the sides in a round with right sides out. I use glove stitch and a double thickness of thread, but you could use any decorative stitch and maybe an embroidery floss? Although, I'm not sure if floss would be strong enough as it has to hold all the sides together under quite some tension.
Decide which end of the 'tube' is to be the top and stitch all the way round with the same decorative stitch.
Join the base (make sure the main fabric is on the inside - I don't want any crying just as we are reaching the finishing post!).
By the way, the plastic is from a plastic 4-pint milk bottle.
Finito! Cuppa. Shoulder massage. Chocolate, anyone?
No comments:
Post a Comment